Pages

Friday, August 31, 2012

Sunburst Mirror

 I always wanted a sunburst mirror but they are so expensive. So I decided that I would make my own-
 so much cheaper. 

I love the way it looks
and it was fun to make too.


 Supplies:
-spray paint
-hot glue gun & extra glue
-circle mirror
-foam for flower arrangements


 First I took the sticks and cut some short, medium and left some the same.


 Second I shoved the sticks into the foam side by side in a random order.


Then once all the sticks were in I spray painted the sticks white, but you can do whatever color you want.


Finally I hot glued the mirror to the circular foam.

 I'm so proud of the finished product doesn't it look fabulous. Hope you love yours as much as I love mine.


Friday, August 24, 2012

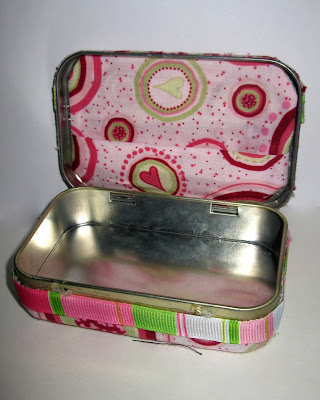
Repurpose: Altoid Tin into Sewing Box

Sometimes when I'm out and about I end up needing a sewing kit.

To sew back on a fallen button, to pin together a ripped seam, to cut loose threads, etc.

But I don't want just any sewing kit I want mine in a cute case!


It has everything I need in it.


And it's oh so cute!


Supplies:
-Dollar Store sewing kit
-Altoids tin
-Scrap fabric
-Scrap batting
-Ribbon
-Hot Glue


First lay the emptied tin on the scrap batting, trace around the edge, and cut.
Do the same for the fabric cutting it 1/2 inch bigger than the tin, this is to cover the sides.


Hot glue the batting to the bottom and top of the tin.
(this is the bottom, I did the whole top first then the bottom).


 Put the fabric on over the batting stretching the fabric around the sides and hot gluing. Make sure to leave the hinges uncovered. Then trim the excess fabric as close to the edge as possible.


Do the same to both sides. I found that the tin closes better if you cut the fabric 1/4 inch short of the top, where the lid overlaps the bottom.

To make the pocket I took a rectangle of fabric (as wide as the tin plus 1/2 inch and as long as the tin plus 2 inches) and folded the edges in 1/4 inch on all sides and pressed it. Then I folded the bottom under 2 inches wrong sides together and pressed it. Lastly I folded the bottom up 1 inch and pressed it. 
(If that is super confusing fold it in whatever way will fit, with the bottom folded up, and it will work.)

Glue it in and you have a pocket (because the corners of the tin are rounded I folded the corners of the pocket in so it would fit.)


To make it more decorative I glued a ribbon around the bottom edge just under where the lid overlaps.
(The box is upside down in the picture.)

I also added a ribbon on the top.


And a cute little bow (the tutorial for the bow can be found here).


Who would have thought an Altoids tin could be so cute.
And really you could fill it with anything!


Friday, August 17, 2012

Summer Wreath

 My door is very plain, and  I wanted something bright on it for summer.

The sunny weather inspired me to make this wreath, yellow just like the sun. It was very bright and cheerful so I didn't want to add much color to it. Just some simple white flowers I made out of an old knit shirt to give the wreath a bit of interest.


 Supplies:
-Wreath form
-Yellow yarn
-White fabric/old white t-shirt
-Scissors
-Needle & white thread
-Hot glue gun & extra glue

First I tied the yarn around the wreath, then I proceeded to wrap it around the entire wreath. This will probably take you the longest. Make sure to pull tight so it looks neat and tidy. When you reach the end tie again like you did at first. If you want to make sure it stays add some hot glue.


 Second I made the flowers out of this old t-shirt that had a whole in it.


 I cut squares in varying sizes to have different sized flowers.


 Then I folded the squares to make them round.


 Make sure you cut the open side/ unfolded side to make it round.


 Unfold the fabric. Get your needle and thread, thread your needle, then sew along the entire edge of the circle.


 Pull the thread tight to bring the fabric together. Push the middle into the fabric and tie off your thread.


 Finally you now hot glue those flowers onto your wreath and voila you have a beautiful summer wreath.

This is how it should look in the end have fun.


Friday, August 10, 2012

Knit Fabric Flower Headband

Sometimes hair needs an accessory, it really completes an outfit and I love making them!

This one in particular goes with a lovely dress I made my little girl found here

These flowers are made out of a knit fabric, and as you know knit doesn't fray so the edges can be left unfinished which gives a fun fringey look to it.


For little heads, 

Or grown up ones.


They can be casual, 
or fancy.


Supplies:
-Strips of knit fabric (I used three 1"x 8" pieces)
-brads or beads
-enough elastic to go around your/your little one's head 
-scissors and sewing supplies


To gather the strips.

First you are going to gather the strips by sewing a basting stitch, which is when you lengthen your stitch length to as far as it will go and not back stitching.
(This can be done by hand using the same method.)


With a piece this short in length you'll want to secure the threads on one side by tying the ends together. (When gathering a longer piece of fabric you'll want to gather one side to the center then gather the other side, to keep the threads from breaking.) Then on the other side pull one of the threads to gather.


To make the flower

1. Continue pulling until the fabric it tightly bunched together.
2. Cut the non bunched edge in a wavy pattern.
3. Roll the strip with the right side on the inside.
4. Hand stitch the bottom (or gathered section) to secure the roll together. 

Next push a brad through the center to the other side. Or here you could sew on a bead.


Repeat this for as many flowers as you would like. 

And attach, glue or sew these flowers to anything they look good on.

In this case I made three to put on a headband.

Headband

To make the headband cut an oval out of the same knit fabric.

Then poke the end of the brad through the fabric oval. 
(If you use a bead instead of a brad here you can just hand stitch it on.)

Then poke the other two flowers through the oval and secured the brads by pressing the metal tabs open.

Then measure the elastic piece and cut it to fit on a head (whoever your making it for) and sew the ends together.

Next wrap the sides of the oval fabric around the elastic covering up where you sewed.

Then stitch is closed catching the elastic as you sew to keep it from sliding around on the headband.

And there you have it, a new head band out of old knit fabric. 
Who said you can't make something out of nothing!  (well not nothing but at least very little).


Friday, August 3, 2012

Onesie & Pants into a Fancy Dress

I love little pink dresses!

So when I got this hand-me-down outfit I thought that the jacket looked more suited for a dress.


I made the onesie into a dress and the pants into a bum cover to go with this adorable jacket.

Any pants and onesie outfit with a stain on the bottom half of the onesie? Then this would be a great fix, follow along with me!


Supplies:
- Little outfit: onesie, pants and jacket (optional)
-1/3 yard fabric, this will be the skirt of the dress
- elastic, about a foot 
- Ribbon, one yard
-Sewing machine 
- Sewing supplies (scissors, thread, etc)


First cut the onesie in half where you want the skirt to be connected (don't forget to allow for the seam allowance). Then cut the pants just under the bum to an inch under the crotch seam.


I started first with the pants to make the diaper cover. Hem up the leg holes with a double fold hem leaving a hole to thread the elastic through. I attached a safety pin to the end of the elastic to make it easier to thread it through the hem.


Next double fold hem one long side of the skirt fabric, and single fold hem the other long side with a zigzag stitch. Then stitch the salvages (short sides) right sides together at 3/4 inch or however wide the salvage is. Then cut the excess fabric off the seam down to 1/4 inch, and zigzag the raw edges together.


Fold the skirt fabric in half and mark the center with a pin. Then we gather the skirt by base stitching (long stitch length with no back stitch) the top, leaving the strings long. Then carefully pull one of the treads to gather the top of the skirt just to the center pin.


Gather enough for the pin and the seam of the skirt to be the same width as the front of the onesie top. Then do this to the other side so the skirt is the same width as the whole onesie and secure it with a pin.


Then pin the gathered skirt to the onesie top with the skirt seam lined up with the closer (snaps) in back. Start at the seam and stop when you get 2 or so inches from the other side, if the skirt is a bit too small or big you can gather it more or less to make it fit. Then sew it on.


Next sew on the ribbon over the gathered edge to hide it, stitching on both sides and tucking under the ends. I put this seam in front on the side because it will be covered by a bow. 


To make the bow cut a piece of ribbon 6 inches and fold in half with the ends in the center, folding under the end that shows. and stitch. (I stitched it with the sewing machine but you could hand stitch too.) Then cut another piece 2 inches and wrap it around the center and hand stitch it in place on the back. (A bow from this tutorial would also look great.)


Then stitch it to the dress covering up the ribbon seam. (You could do this in the back or the front.)


Now you have a cute little dress with a jacket and bum cover for your little one to wear.