Pages

Friday, November 30, 2012

Christmas Ornament Wreath

I have been trying to find the perfect Christmas wreath for some time now and made many failed attempts. 

Luckily I found this great way to make a wreath with only a wire coat hanger and some Christmas tree ornaments. 

Want to make one too it's really easy!


Fun sparkly wreath!


I used red and silver ornaments!

Supplies: 
- Wire coat hanger 
- Christmas tree ornaments of assorted sizes 
- Ribbon
- Hot glue gun and glue


First unwind the top of the hanger by the hook, and bend it into a circle.


Get all of your ornaments together.
I used 6 containers of plastic ornaments from the Dollar Store of varying types and sizes.

Start by threading the ornaments through the wire.


Put them on in a random order using all the sizes.


Put all the ornaments on turning each one so they fit into clusters


Then connect the ends of the wire by wrapping them around each other.


Lastly cut some ribbon for a loop and a bow, then tie the bow.
(If you need help in making a bow you can use the bow from this tutorial, just make the tails longer. However it will look a bit different from this one.)


Tie the loop to the wire and hot glue the bow to the top of the loop.


All done, wasn't that simple! 


Friday, November 16, 2012

Give Thanks Saying Plaque: for a Fun Thanksgiving Decoration*

 I wanted to make a wall plaque for a Thanksgiving decoration. I though it would be good to have it say "Give Thanks Everyday"
What a fun idea to help us remember to be thankful this Holiday/Thanksgiving season,
and always!

I had a sign my husband made in high school wood shop that had Volcom carved in it (like the brand) and wanted to make something else out of it and this is what I came up with! 
(the cute cloth pumpkin are found here)


Cute isn't it!!!


Here's how to make your own:

Supplies:
- Wood piece 
- Some paper
- ModPodge and brush

First  paint the edges of the wood and in just a bit.


Then take some of the paper, cut it to fit the whole wood piece (She used two pieces cut 7"x12"), and ModPodge it on. Make sure that the edges of the paper are covering up the un-painted parts. 


Let it dry compleeley.


Cut the letters out of the other paper. I used my new Sillhoette SD cutting machine, but you can use any cutting machine or cut it out by hand. 


Place the letters how you want them to fit on the board. Then brush a layer of ModPodge over the top of each letter holding it in place, and let it dry. 


That's it! A beautiful wall plaque reminding us to be grateful, not just for Thanksgiving, but all year round as well.

Friday, November 9, 2012

Fabric Pumpkins

I thought it would be fun to make some pumpkins for a fall decoration the little ones could help with. 

This fun fall decoration would also make a great 
Thanksgiving Center Piece.

Multi-colored pumpkins have always been my favorite kind, so it's going to be patterned fabric pumpkins!


Add some leaf vines.


Or just stack them together.
It's a centerpiece that even the little ones will love.

Supplies:
-Fabric square (whatever size)
-Yarn & yarn needle
-Polly-fiber fill (stuffing)
-Felt scrap
-A stick (as tall as your pumpkin)
-Scissors and a hot glue gun


Take your square of fabric and fold it in fourths (fold in half, then half again). Then cut off the corner in a rounded cut and you have a circle. (After opening it I needed to fold it back up and round the corner more to get a more symmetrical circle.)


Next, sew around the edge in a very loose stitch with the yarn, make your stitches 2-4 inches apart. Sew all the way around the fabric and cinch it together like a pull string bad.


Then stuff the pumpkin with the fluff, as much as you want. The more fluff you use the firmer the pumpkin will be. Cinch it closed and tie it off leaving an opening about a half inch, but don't cut the yarn. 


Find the middle of the ball on the top and put a ring of hot glue in the center. Wait until the glue is dry and cut an X in the hot glue circle. This will keep the cut from frying. Then poke your finger in the hole to the other side and make tunnel to with your other finger through the bottom. 


Next take the yarn string and wrap it around the pumpkin and thread it through the tunnel in the center. Pull the yarn snug but not too tight. 


Now wrap it around again on the other side.


Continue doing this until you have 6 stings of yarn wrapped evenly around the pumpkin.


Next tie off the yarn string and cut it.


Then take the stick and push it through the tunnel in the center 


It should poke out the other end but just a little bit.


Next cut a small circle of felt about the size of a half dollar and hot glue it to the bottom of the pumpkin.


Put some hot glue to the bottom of the stick as well, to secure the stick in place. 


Put some glue at the top, just a small amount, to hold the fabric to the stick.

Make more in different sizes and colors, and you have some fun and soft pumpkin for any fall occasion. 

Friday, November 2, 2012

Re-Purpose: Old Dress into New Skirt (with elastic waistband)

 I was going through a box of pre-pregnancy clothes (I finally got it out of the attic) 
and I found one of my favorite fall dresses but it didn't fit right any more. 

Well, honestly it never really fit to begin with but I loved the fabric and the pockets on the skirt. 

To save this long time favorite I decided to make it into a skirt with an elastic waist band! 
It's always nice to have a new skirt!


I love pockets on skirts.


The elastic waistband makes the gathering. 

Supplies:
-An old dress that fits your waist or a skirt that has pleats or gathers and a zipper will work also
-Elastic (enough to go around your waist)
-Ribbon if the dress (or skirt) doesn't have a sash
-Sewing machine and supplies

First I took out the zipper with a seam ripper. (The zipper actually got stuck and broke years ago and I had been pinning it.. oops) Then I cut just under the skirt and bodice seam removing the skirt part of the dress. Next I cut off the sash which was only attached at the front


To keep those useful little pockets I re-secured the top with a zigzag stitch.


Then I stitched both pieces of the sashes together, folded it in half and pressed it.


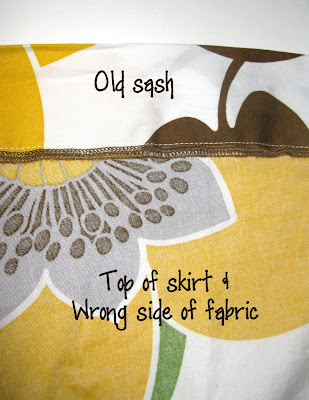
To make a casing for the elastic I sewed the sash about an inch from the top of the skirt with the raw edges of the sash on the wrong side of the skirt.

I sewed it all the way around over lapping it an inch and folded under the end.


Then I folded the sash over and stitched it to the front side. This makes the elastic casing.  

Make sure to leave a gap in the stitching to put the elastic through. (I like to put a safety pin at the end of the elastic to help guide it, and when you get all the way through you can safety pin the elastic together for a fitting instead of using a straight pin and accidentally poking yourself.). At this point I tried my new skirt on to make sure it fit well and adjusted it accordingly.

I used a zigzag stitch to sew the elastic together.

Then I stitched the hole closed

There it is... an easy way to keep an old favorite. And now it's more comfy too!