Sometimes after a long day of taking care of a baby you want to put your feet up.
Or even when you didn't it's just nice to have something soft and plush to rest your feet on.
Gliders usually come with matching ottomans, however ours was not included.
So I thought why don't I make a foot rest/poof that matches her room decor, then she can use it too, as a seat!
If you would like to make a poof for little ones to sit on or for your feet...
follow along!
For putting your feet up.
A comfy seat for your little one.
(she's a drooly cutie.)
(she's a drooly cutie.)
Also has a zipper so you can conveniently wash it when it becomes dirty.
Supplies:
- 16"x 57" of soft fleece and one of cotton (for casing)
- Two 18" diameter circles of minky and two of cotton (for casing)
- 16" zipper
-Sewing machine and supplies
*Figuring Measurements*
If you would like to make the poof another size or if the circle is hard for you to make at my dimensions I will show you how I figured out the measurements.
1. First decide how tall you want your foot rest/poof to be- mine is about 16 inches.
2. Remember that a cylinder is made up of 2 circle pieces and 1 rectangle.
3. Then I traced a bowl onto paper and used this as a pattern for the circle (you can use any circle in your house that you can trace onto paper).
4. Then measure the circumference of the bowl and that will be the length of the rectangle- mine was 56"
5. Then add an inch for the zipper or seam allowance.
For the casing
The casing is to help the poof keep it's shape. Also having a casing will make you able to throw the slipcover in the wash without having to un-stuff it. I used an old cotton sheet however waterproof fabric would be good if you plan on little kids using it often.
Start with your rectangle casing piece, fold the 16" edge in 1/4 inch then press, and sew.
Then pin the circle piece to the long side of the rectangle. Let the rectangle over lap if it does. Then sew it and repeat with the other circle.
And that's the casing.
And that's the casing.
Now the Slip Cover.
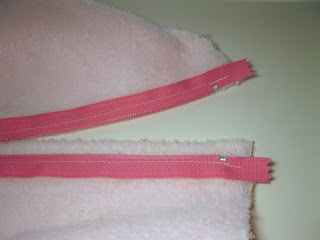
We are going to attach the zipper first by opening up the zipper. Then lay the one zipper side on the 16" rectangle side. Make sure that the right side of the zipper (or the zipper front) is facing the wrong side of the fabric, so the pull tab will face out when it's all sewn together. Then pin the zipper side a 1/2 inch from the edge, this will make the overlap that hides the zipper. Then sew it on.
We are going to attach the zipper first by opening up the zipper. Then lay the one zipper side on the 16" rectangle side. Make sure that the right side of the zipper (or the zipper front) is facing the wrong side of the fabric, so the pull tab will face out when it's all sewn together. Then pin the zipper side a 1/2 inch from the edge, this will make the overlap that hides the zipper. Then sew it on.
Next pin the other side of the zipper to the other end of the fabric, this side is pinned right on the edge. Make sure nothing is twisted and then sew.
Then you want to zip the zipper up. Your rectangle should now be a tube. Here I put a pin at the bottom of the zipper and cut off the excess zip. (You can also do this step after you sew on the circle pieces.)

Pin on the circle pieces. This time you should have no overlap, but if there is some you can ease it in while you sew.
Then sew them together and finish by surging or zigzagging the edges.
Then you will want to turn the slip cover right side out and put the casing inside the slip cover. Straighten it out so the circle parts and opening match up. Next stuff the poof. (I used a foam piece around the edge to give the poof more support and 2 bags of Polly-fiberfill).
To keep the stuffing in hand stitch the casing opening closed, with whatever stitch is easiest for you.
Zip it all up, plop your feet on top and enjoy!


No comments:
Post a Comment