Pages

Friday, June 29, 2012

Fabulous Fourth of July Party

The 4th of July is one of our favorite holidays! We spend the holiday together with all of our family playing games, eating and of course doing fireworks all out side! Being from Portland we don't get to do that very often. So for us it's always been a challenge to decorate out side but we've found some fun decorating ideas.


 First I think it's really important to have some American Flags but we didn't have any fabric ones so we made some out of paper. I started with a white piece of paper and cut red strips and a square of blue paper with a dot pattern. 


 Then I glued the paper pieces on and hot glued the "flag" to a skewer.


To go with that we hot glued some star cut outs to some more skewers. And put them together in a bucket full of sand from the dollar store.


For the table covers we took some old flat sheets and a plastic table cloth from the dollar store, cut it into thirds and used it as a runner. Then we put the buckets on the table as a center piece. We thought that some Chinese lanterns also from the dollar store was a fun touch.


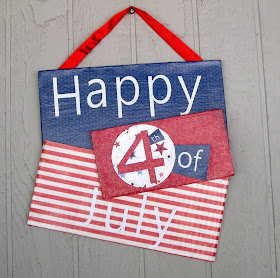
To add a couple more fun touches we modpodged some patterned paper cardboard with some letters. And hot glued on some ribbon to hang it. 


Another great touch was to take some random USA items and arrange them around a grapevine wreath.


We all had so much fun as a family. And the little ones had fun with those flags! 
Have a safe and fun 4th of July!


Friday, June 22, 2012

Pocket Shoe Holder

Baby shoes are so tiny and cute, people just can't resist them.

 My little girl has way too many, considering she just learned to walk. So I decided I needed a good shoe organizer.

This organizer would be great for anything small as well- like jewelry, toys, office supplies, etc.


Supplies:
- one 28"x 26" rectangle cotton
- four 5"x 36" cotton
-ribbon (I used rickrack)
- dowel rod about 18"
-Buttons (optional)

First double fold hem the big rectangle 1/4 inch all the way around, press and sew. Then bring down the top 1 inch, press and sew to make the pocket for the dowel rod. Your big rectangle should now be about 26"x 25".

Then fold it into fourths length wise excluding the rod pocket and press. This will make guide lines for sewing the strips on.

Here you can see the guide lines (kind of).

Then press the sides of the small rectangles down 1/4 inch and sew just one of the long sides. (The rest of the sides will be sewn when you attach it to the big rectangle.)

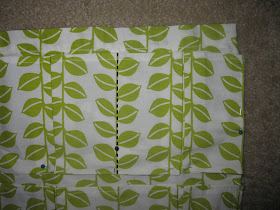
Now you will do a lot of pinning and measuring so stay with me. (The point of all this is to create two 1 inch pleats in the center of each pocket.) Measure every 9 inches and put a pin (1). Then inside every 9 inch section find the center (2). Then from each edge of the 9 inch section measure 2.5 inches towards the center and put a pin (3).


Next you are going to move both pin 3 to where pin 2 is. This creates the pleat.

From where pin 1 was to the edge is the pocket, it should measure 5 inches.

Then you repeat that for all the pockets - 4 pockets on one strip and 4 strips. Then when you have all the pleats made and pinned, press it so it will stay in place.

When you have all the strips pressed and pinned line each strip up with the pressed lines from before (make sure the sewed hem side is on the top). Then pin it all in place.

Next sew the sides and the bottom of each strip to connect it to the big rectangle. Then sew to separate the pockets (at where pin 1 was) every 5 inches.

Then you are going to sew the rickrack to the edge of the rod pocket going diagonally. (This makes the hanger.)

Then put the dowel rod into the rod pocket.

And push it all the way until you have about an inch of fabric at the end.

Then put a pin in holding the dowel in place, and sew the other end of the rickrack on.  


(I added some rickrack at the bottom and buttons for decoration.)
Here it is, a way to keep all those cute, tiny shoes! It fits nicely in her closet and someday when her shoes are too big to fit any more we can use it as a toy holder.
I love it when things are multi-purpose! :)


Friday, June 15, 2012

Simple Curtains

Living in an apartment means using all the space you have 


However some spaces just aren’t pretty. 


In my case that’s our closet, the first thing you see when you open it is the water heater. Yuk! 


A quick and easy fix for this is a curtain.


Supplies:
~ enough fabric to go from your ceiling to the floor
with 3 extra inches for the rod pocket and 2 for the hem
(I doubled mine because it was so shear)
(Any nice shear fabric will work I used a bolt my Grandma gave me)
~ Sewing supplies (scissors, iron, sewing machine, thread, etc)
I started with 5 and 1/3 yards of a shear organza fabric, double what I would needed because I wanted two layers. (A bolt I got from my grandma when she was cleaning out her supply. Yeah!) If you are only using one layer you can skip the next two steps.
I decided to do a variation of the french hem. First I took both layers and put one on top of the other. (There is no right or wrong side to this fabric so it didn’t matter for me but if yours does then you would start out with right sides together.) I stitched them together at 1/2 inch, then cut it down to 1/4 inch. (This is to make sure it’s all very even.)
Then I flipped the fabric over so the raw edge was between the two layers, pressed it and stitched it at 1/2 inch to encase the raw edge. 


Then I sewed the sides down, going 2 inches from the top so the layers are sewn together at the top.
(I’m not doing anything to the sides because the salvage keeps it from fraying and I think it looks fine.)
To make the rod pocket I folded the top down 2 inches (where it was sewn together on the side) pressed it then sewed it. (If you have just one layer you will want to fold it down 1/2 inch and press it first. Then fold it down 2 inches to make a double fold hem rod pocket.)
For the bottom I double folded it 1 inch, and sewed. 
(Double fold hem: fold and press, then fold and press, then sew).

This next step might seem weird but this will keep the light fabric weighted down. I cut a refrigerator magnate (the kind that look like business cards from random companies that you usually throw away) into 1/2 inch squares and stuck a few together.


(If you don't have useless magnets laying around you can also use pennies.)
Then about one inch from the edge at the bottom I sewed from the hem line to the end. Then I put a magnet clump in.
Next I sewed the magnet in by closing the pocket I just made (careful not to sew over the magnet or you will break your needle).
(See the magnet in the pocket it will weight the curtain down so it wont float all over and you can’t even tell it's a magnet.)
Now I can open my closet without thinking about the water heater- it’s still there but I don’t have to see it. Also a nice hidden place to store the brooms.

Monday, June 11, 2012

Mason Jar Soap Dispenser


I saw this idea on Pinterest - a soap dispenser made from a jar- and I thought it would be fun to try it with a mason jar.


Supplies:


-Mason Jar
-Knife or exacto knife
-Pliers
-Hammer
-And an old hand soap pump


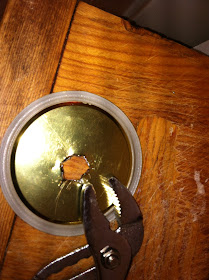
First measure the circumference of  the old soap pump to make sure it will fit perfectly, then mark where the hole will be and using the knife cut the hole.  Pry back the edges to make the hole bigger.
.

 Hammer down the sharp edges.


 Put the pump in the hole. If you'd like to glue it in place to make sure it won't move, go right ahead. You could use hot glue or magnet glue, but I went the easy way out and it still works great. You can get the dispenser off any old soap or even lotion bottle anything you can find would probably work.


Finally put the soap in the jar, put the lid with the pump on and screw on the band. "TA-DA" we have a crafty soap dispenser. What's even better is that it cost me nothing. I just used things I already had at home and I'm sure most of you have these items as well.


Friday, June 8, 2012

Ribbon Bows

(Part 3 for baby hair accessories, part 1 found here and part 2 found here.)


I guess I'm just really into hair bows right now but I found another one that I really like. And this one can be used for anything that needs a bow!


To start cut your ribbon to the desired length. A little tip I learned about ribbon to keep it from fraying is to melt the end a bit. I did this with a lighter, just make sure you don't get it too close or it will turn black.

Then fold the ribbon into thirds with the ends poking out. (You can do the ends longer, I just think it looks cleaner this way.)

This is what it looks like in the back.

Then you pinch it in the center (there's really no wrong way to do this part- just pinch it). And stitch it in place. I like to wrap the thread around the center just to make it more secure.

Now to do the center ribbon- you can use the same ribbon or a different one that matches to give it more color. Tie the ribbon in a loose knot with enough ribbon on either ends to wrap around the center of the other piece of ribbon. (Don't forget to melt the ends on this one too.)

Wrap this ribbon around the first with the knot in front. Then stitch this ribbon in place sewing it through both ribbon pieces.

Then I sewed on a safety pin so I could attach it to the headband or dress or hat!

The finished bow- I think this would be a good present topper.